
Water TD Builds: How the Two-Build System Works
Every Water TD turret has two builds. Here is what the diamond nodes cost, how CLEAR and PERFECT gate them, and how to choose without wasting currency.
The store page says it in one line: every turret has two builds that change how it fights. That sentence is doing more work than it looks like. In Water TD, a build is not a stat package bolted onto a turret; it is a second behaviour, and picking one usually closes the door on the other.
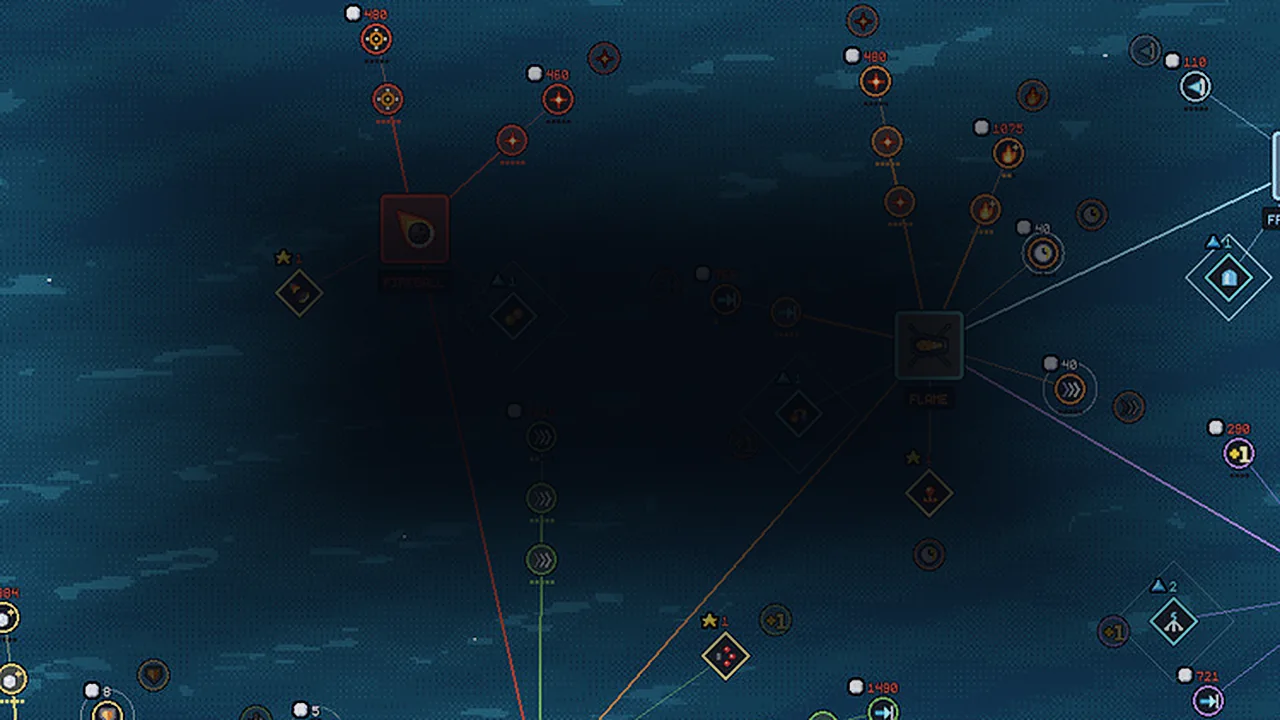
What a build node looks like
Build nodes are the diamonds on the skill tree, not the big square turret icons. They sit on short branches off a turret node and are marked with a small shape and a number instead of a BASIC cost:
- ▲1 / ▲2 — a build paid for in CLEAR, the currency you earn by clearing levels.
- ★1 / ★2 — a build paid for in PERFECT, the currency you earn by clearing levels without letting the base take a hit.
The number is the amount. A ▲1 diamond costs one CLEAR; a ★2 diamond costs two PERFECT. On the tree screenshot from the launch build, FLAME's first diamond sits at ▲1, FIREBALL has both a ★1 and an ▲1 diamond, and MORTAR's pair costs ★2 and ▲2.
The diamond is unlocked permanently and the second diamond usually offers the alternative behaviour rather than a refund of the first. Decide which behaviour your maps need before you spend PERFECT, because perfect clears are the slowest currency to earn.
Why CLEAR and PERFECT exist as separate currencies
Two currencies, two kinds of player progress. CLEAR rewards finishing content; PERFECT rewards finishing it cleanly. A player who grinds through maps with 40 HP left accumulates CLEAR but no PERFECT, so they can buy most first builds but not the premium ones. A player who replays for clean wins accumulates PERFECT and can buy the second build on the turrets that matter.
This is also why the achievements split the same way. Untouchable (win a level without the base taking a hit) sits at a 91.7% unlock rate, which tells you clean clears are common early. Flawless Victory, which requires that on every level, sits at 0.1%.
What each build is for
Because the game does not print stat sheets, the useful way to think about builds is by the situation they solve:
| Situation | Build property you want | Turrets where it matters most |
|---|---|---|
| Flood arrives in one deep channel | Concentrated damage | LASER, AUTO |
| Flood fans into several thin streams | Multi-target coverage | TESLA, MORTAR |
| Water keeps reaching your second rank | Close-range sustain | FLAME |
| You need to move water, not kill it | Push strength and coverage | FAN, FROST WALL |
| You are losing banks faster than turrets | Reach and stability | MORTAR, AUTO |
If a build does not solve one of those five situations for you, it is a purchase you can defer.
The cheapest useful build order
- First diamond on the turret you place most. For most players this is AUTO or FLAME, because they are the two families that appear in every level.
- Second diamond only when the map demands it. Buying both builds on one turret is only correct if you actually switch between them.
- Premium diamonds last. PERFECT is scarce, and the turrets with ★ costs are usually the ones you unlock late anyway.
The broader economy is covered in the upgrade points guide→, and the node layout is in the skill tree guide→.
How builds interact with erosion
A build that increases reach is worth more than its numbers suggest, because reach lets a turret keep firing after the bank in front of it has been cut away. A build that increases close-range power is worth less on a map where the water never gets close.
This is the one place where the game's terrain simulation changes a build decision rather than just a placement decision. On a map with wide, slow rivers, reach wins. On a map with tight spirals where the flood arrives fast, close-range power wins.
Replaying an early map is the cheapest way to see what a diamond actually changed. You already know the terrain, so any difference in the outcome is the build, not the map.
Start with the turret list→, then read best turrets→ for the ranking, and skill tree→ for where build nodes sit.
Frequently Asked Questions
How many builds does each turret have? Two, per the official store description: every turret has two builds that change how it fights.
Do builds cost BASIC points? No. The diamonds are priced in CLEAR and PERFECT instead of BASIC, so they compete with each other rather than with ordinary node ranks.
Can I unlock both builds for one turret? The tree shows two diamonds for several turrets, which implies both can be owned. Whether both can be active at once in a single level is not stated in game, so treat the pair as alternatives until you test it.
Which build should a new player buy first? The first ▲1 diamond on whichever turret you place in every level. Do not spend PERFECT until you have a map that specifically needs a premium behaviour.
Sources
Official source: Two-build system and upgrade description: Water TD on Steam ↗ Community source: Currency and achievement behaviour: Steam achievement stats ↗ Official source: Post-launch balance changes: Water TD news hub ↗